Search Results
120 items found
- The Best Growing Mediums for Microgreens
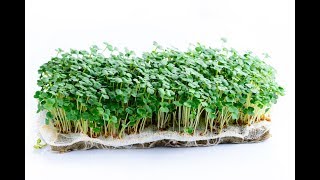
Growing microgreens is an easy and sustainable process that you can do from the comfort of your home. You can grow all kinds of nutritious microgreens that will enhance the flavor of your foods. These special vegetable-like plants grow from 1-3 inches and are vibrant additions to your foods. They are also jam-packed with vitamins and antioxidants. We're going to discuss the different growing mediums you can use for your microgreens. Soil Using soil as your growing medium is a popular and effective choice. Soil will provide you with the best yields over any other medium. We believe the Sunshine #4 by Sunshine Aggregate is the best, and the Black Gold Potting Mix is a close second. Each of these soils are extremely sterile, which is ideal for indoor growing. While these soils can cost more (about $1 per 10x20 tray), they provide the best results. But, don't worry. You can compost and sterilize your soil to re-use it for future grows. Burlap Burlap is another popular growing medium because it's cheap. For .25 cents a tray, you can't beat the price. It is made from the jute plant, which is used to make nets and ropes. But burlap is an incredibly difficult growing medium to use. The perfect growing conditions for burlap include 72 degrees Fahrenheit, 65% humidity, and a good micro-dose fertigation plan (fertilizer + irrigation). If you can populate these results, then you can achieve yields and results that match soil mixes. But be mindful that this takes a lot of practice and time, which is why using burlap is better for expert growers. If you don't get the growing conditions right, then your yields will suffer. We recommend using larger seeds like Pea Shoots and Wheatgrass when using burlap. These seeds will thrive with a burlap growing medium, and you will get bountiful results. Coco Coir This growing medium comes from coconut fiber. It's perfect for holding in moisture and is difficult to over-water. It is cheaper than soil (about .60 cents a tray), but it's just as messy. Coco coir has a better yield average than burlap, about a 25% to 30% better average. You will find this growing medium in dehydrated blocks. When you add water, they will expand way past their original size. You can use coco coir with an ebb and flow hydroponic method. Jute Pads This growing medium is derived from jute fiber. It's able to transport water evenly through your microgreens and maintain a near-perfect water/air ratio. It holds in water very well, which means you'll have to feed your microgreens less. Kale and broccoli grow especially well in jute pads. What's the Best Growing Medium? This entirely depends on your growing intentions. What are you planning to grow and how much effort are you willing to put in? We're going to cover the main questions you should ask yourself that will help you make this decision. Feeding Your Plants: If you want to water your plants by hand, then we recommend soil and coco coir. But if you're able to feed your plants on a timer, then go for burlap or jute pads. It can be a better option because it's cost-effective and can still get the job done. Choosing Your Seeds: What kind of microgreens do you plan to grow? If you're growing broccoli or kale, then we recommend buying jute pads. Do you want to grow a wide variety of seeds? Then choose soil or coco coir as your growing medium. Messy Vs. Clean: Do you hate cleaning up messes? Then it's best to steer clear of soil and coco coir. Go with jute pads since they're easy to handle and clean. Choosing your growing medium ultimately boils down to what you're planning on growing and how much effort you want to exert. We hope this list helped you understand what kinds of growing mediums there are and how they can help you yield the best results. We are the microgreen growing experts. We're even working with NASA to help figure out how to get microgreens safely into space for astronauts to use! We meet once a month to discuss a variety of topics about microgreens. So, keep reading our blogs and watching our informative YouTube videos. There will always be exciting news coming your way. #growing #medium #growingmedium #growingmedia #microgreeneducation #microgreensfarmer #microgreens #microgreen #bestmediatogrow #SmartNaturals #growmedia #growmedium #growingmicrogreens
- How to Use Spent Coffee Grounds for Planting Nutritious Microgreens
Are you a coffee lover that hates to throw away your spent coffee grounds? Well, there's some good news. Coffee grounds have a miraculous wide range of benefits that are beneficial for your garden. In this article, we are going to cover how you can use spent coffee grounds for planting microgreens at home. Making the best out of waste As humans we consume plenty of goods, but we also produce a lot of waste. We need to learn as a society how to reduce, reuse, and recycle. Learning how to use coffee grounds for planting microgreens is a great way to start and make use of our waste. What items will you need to grow microgreens So you've decided to start growing microgreens. We're going to cover the inexpensive items you will need to start this simple process. Spent Coffee Grounds Jelly Cups (or a small plastic container you have around the house) Spray Bottle Paper Towel Microgreen Seeds Measuring Spoon What's wonderful about this list is that it is extremely cheap. Using coffee grounds for planting microgreens is affordable for everyone. How to use coffee grounds for planting microgreens Growing microgreens with coffee grounds is actually quite simple. First, you will get your spent coffee grounds and place them on the paper towel. Make sure to dampen the grounds to soak up the moisture. Then you will place the spent coffee grounds on a fresh paper towel and let them dry overnight. The next day you will place the dried coffee grounds in your jelly cup. Grab your spray bottle and lightly spray the top of the grounds. Next, you will want to grab your microgreen seeds with a small measuring spoon. Sprinkle the seeds evenly over the grounds. You will want to grab the spray bottle and spray the seeds lightly. You are going to use another jelly cup to be the humidifier dome. Do a light spray on the second jelly cup and place it over the first one that contains the seeds. Leave in the dark like this for a day or two and then place in the light. After about 7 - 10 days, the microgreens will sprout. You can now cut them and eat them with salads or to decorate your foods. This process is easy-to-understand and simplified. Using your spent coffee grounds for planting microgreens is a cost-effective way to grow food at home. Why Is This Important? Learning how to grow your own food is essential for families and tight-knit communities. We grow, flourish, and bond over food; and when it grows close to home, we are even more connected. Using coffee grounds for growing microgreens is for everyone to try. Microgreens are great to share with the family, to decorate your plates, and to enhance flavor. Take control of your food and start growing today. If you enjoyed this, you might also enjoy these post: "Urban Vertical Farming" "How to stay healthy and grow microgreens" #coffeegroundsforplanting #microgreens #microgreen #growmicrogreens #growingmicrogreens #spentcoffeegrounds #microgreensathome #growingfood
- Urban Vertical Farming: The Key to a Sustainable Future
Living in a dense city population can make you wonder, "where does our food come from?" When you live in urban areas like Houston, New York City, or Seattle, it's rare that you notice farms on your drive to work. The idea that our food is grown hundreds to thousands of miles away can be worrisome. What if something were to happen to those farms? Our resources would cut off and we would have limited access to foods. This is why vertical farming in urban areas is critical to ensure cities can be sustainable food leaders. What is vertical farming? Vertical farming is the practice of growing crops/foods in vertically stacked layers. This is usually done indoors and in a controlled environment. This method optimizes plant growth and allows the use of soilless techniques such as hydroponics. How does vertical farming work? Vertical farming needs several things to work. We'll cover each one below: Physical Layout - The purpose of farming indoors is to maximize volume. We do this by maximizing the output efficiency per square meter. This is why you will see physical layouts in the form of skyscrapers or vertical tower-like structures. Lighting - To optimize crop growth, a need for artificial and natural lights are essential. Growing Medium - There are several different growing mediums for vertical farming. These methods include hydroponics, aeroponics, and aquaponics. Coco Coir, Rockwool, ,Biostrate, Vericulite, Perlite, SunShine #4 and Black Gold are great mediums used in indoor farming. Sustainability Features - Sustainable features often used with vertical farming feature rainwater tanks, wind turbines, and spaces with low energy costs. Why is urban vertical farming important? By 2050, the forecast is that we will have an extra 2 billion people on the planet. Many of these people will live in urban areas. And we have already used a third of arable farmland in the past 40 years. We need to come up with other sustainable ways to grow food to ensure we can feed everyone. Vertical farming allows us to grow healthy, accessible foods within a few acres of land, close to home. This is critical for urban areas because they will become more populated over time. Instead of relying on faraway food sources, we need to take matters into our own hands. By establishing urban vertical farming settings, we'll be able to control and grow our own food sources. Vertical farming also uses 95% less water than traditional farming methods. The use of water needed to grow crops traditionally is wasteful. To be able to handle an influx in population, vertical farming is a sustainable solution. How does vertical farming benefit us? There are many reasons why vertical farming is the future of farming. By building vertical farms, there will be an increase in job opportunities. There will be easier access to healthier and attainable foods. With food grown close to home, we will always be aware of where our food comes from. Because of the controlled environment, there is a higher chance of growth success. We will be able to grow crops year-round and have larger yields. Crops will not be exposed to harsh weather conditions since they'll be grown indoors. Urban vertical farming methods should start being adopted right now. The Takeaway To prepare for the upcoming increase in food demand, urban areas need to adopt sustainable policies. People should start growing their food indoors as well as increasing the demand for high-tech farming methods. If you enjoyed this, you might also enjoy these post: "How to stay healthy and grow microgreens" "The Ultimate Guide to growing microgreens" #farming #farmingfeeds #farming365 #verticalfarming #vertical #urbanfarming #localgrown #futureoffood
- How to stay healthy and grow microgreens at home
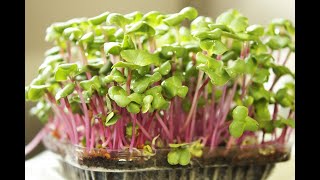
Microgreens, also known as 'vegetable confetti,' are rich in flavor and packed with antioxidants. These tiny vegetables stand between 1 to 3 inches and are beneficial to your health. They contain zinc, iron, magnesium, potassium, copper, and more. They even have polyphenols, which are antioxidants that may lower your risk of diseases and certain cancers. It makes sense why these delicious, flavor-packed microgreens are picking up in popularity. In this article, we're going to cover how affordable it is for you to grow microgreens at home. What supplies you'll need to start growing Before you can start growing microgreens, you'll need to make sure you have the right items. Below you will find the things you'll need to grow successful microgreens: Quality, Organic Seeds - Seeds come in many shapes and sizes and have varying flavor profiles. It's important to make sure your seeds are high quality and preferably organic. This ensures that they're free of pesticides. Growing Tray - This is where you'll house your microgreens. Some people use homemade compost or a container. For beginners, you can also use a microgreen kit. Their design has a spray bottle, grow medium and clear lid that helps keep moisture for the seeds. Growing Medium - This is what you'll use to encourage your plant growth. Growers typically use potted soil as their growing medium but there are other alternatives as well. Spray Bottle Good Lighting - A -south-facing window is a great place to grow your microgreens indoors. This ensures they'll get plenty of sunlight during the growing process. If you don't have windows that get a lot of sunshine, then consider purchasing an LED light for plants. The plants will need about 12 to 16 hours of light a day. How to grow your microgreens Now, we'll talk about the process you need to follow to grow microgreens at home. Their grow life can range between 1 to 3 weeks, which is very exciting. We'll lay out the growing steps below: Fill your tray with moistened soil and lightly compress it. Sprinkle your seed of choice over the soil. Cover them with a small layer of soil. Press the seeds into the soil to help them soak up the moisture; this helps with germination & growth. Cover your container with a plastic humidity dome or stack another tray on top. This creates more moisture in the environment. Check on your seeds daily and spray at least once a day. You don't want the seeds to be wet, but you do want them to be moist. Once the seeds germinate (begin to sprout), you can remove the lid. Spray them once or twice a day by this point. It can take between 7 to 10 days before your seeds are ready to harvest. You'll know when they're ready once they're a few inches high and have a few sets of leaves. Harvest your microgreens by cutting them with sharp scissors. Cut them right above the soil line. Rinse and enjoy! Learning how to grow microgreens at home is a simple and easy process. It's important for your health and can be a great way to ensure you'll always have food at home. These greens have intense, beautiful flavors that can complement any dish and brighten a plate. Now it's your turn to try to grow microgreens at home! If you enjoyed this, you might also enjoy these post: "How to grow microgreens with children" "Growing sunflower shoots microgreens" #growingmicrogreens #growmicrogreens #microgreens #microgreen #growingfood
- How to grow microgreens with children
Microgreens can be taught to everyone, not just adults. Let’s face it, most children stay inside and play video games. What do children know about farming, besides crops and cows. This is the current stigma which has been associated with farming for the longest time. That’s great and all, but along came microgreens. Watching the microgreens sprout is really something that can’t be explained. It’s exciting and might inspire children to be urban farmers or just entrepreneurs. Introducing microgreens to children at a young age is engaging and fulfilling. It’s become a field where innovation is key and the younger generation has plenty of ideas. It’s also a fun and exciting way to connect kids with nature. Here at Nick Greens Grow Team we worked with Kipp One Academy Charter school and had put in place a program that developed an understanding of where food comes. It was a success as the children and faculty all had to work together to make this work. This made it possible for children to connect and appreciate the food they eat. They might even want to eat veggies if they see them in the form of microgreens. Having the microgreens program also gave children the fundamentals. The fundamentals are important because children can attempt to grow much more challenging microgreens. Here is our the steps to grow at home with your children: Grab a 10X20 tray with drainage holes and fill it 1" thick with moist coco coir. Weigh 14 grams of arugula microgreens Seeds into seed shaker, then broadcast evenly across the 10X20 tray. Apply an even mist of water to the tray, then cover it with a humidity dome and place it in a dark space. Germinate for two or three days in a dark location with at least 75% - 80% humidity. Water as described in step three at least once a day. Remove humidity dome from tray on day two/three. Then begin feeding plants your favorite fertilizer using a low flood/continuous flow method of irrigation. Micro Arugula will be ready for harvest around 7-14 days, They will need about 8 to 16 hours of light with a typical fluorescent grow light about 12"-15" from the base of the plant. It’s a fun process and gets children to get active and appreciate the world. Who knows maybe your child will start a whole urban farm in your backyard or basement. If you enjoyed this, you might also enjoy these post: "How to grow micro Arugula" "Guide to growing microgreens" #growingmicrogreens #microgreens #organicmicrogreens #microgreen #growathome #growfoodathome #microarugula #arugula #urbanfarming #urbanfarm
- Growing Sunflower Shoot Microgreens
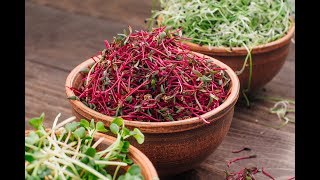
We tend to know sunflowers as the beautiful flowers that we see while strolling through a trail, or neighborhood park. Sunflowers, although beautiful, aren’t just ornamental, but they can be used for other purposes too. The use of sunflowers has been around since the time of American Indians. The American Indian tribes would often use it for cooking, snacks and medicinal purposes. Most of us are familiar with snacking on sunflower seeds or the use of the oil through cooking, but did you know that they are also gaining popularity during the first shoot. Did you know that you can actually consume the shoots? There are incredible health benefits that come from consuming sunflower microgreens. The shoots are high in unsaturated fats, fiber, protein, calcium, iron and other nutrients. Here are some facts about sunflower shoots: Sunflower Sprouts contain approximately 25% protein and are a rich source of vitamins A, B complex, and E and minerals including calcium, copper, iron, magnesium, potassium, phosphorus and zinc. Sunflower Shoots also contain, healthy fats, essential fatty acids, fibre, and phytosterols. Numerous clinical trials have demonstrated that daily consumption of foods enriched with at least 0.8 g of plant sterols or stanols lowers serum LDL cholesterol. Both sunflower seeds and their shoots contain high amounts of vitamin E. Vitamin E works synergistically with vitamin C and selenium to reduce blood pressure, increase the elasticity of arteries and prevent heart disease. The sunflower shoot is a natural expectorant for chest congestion: In Ayurvedic medicine, these sprouts are thought to have the ability to encourage clearance of the lungs. Natural expectorants may also be used as a preventative measure against lower respiratory infections to deter the invasion of pathogens. Sunflower shoots at first may not look very impressive but when applied to food they tend to steal the show. Sunflower shoots tend to elevate any dish, from throwing a few on a simple salad to a Michelin star restaurant gracefully placing a shoot on top of something extraordinary. Sunflower shoots are graced with a nutty flavor and a crunchy texture. We love sunflower shoots so we’ll be giving you some tips on how to grow them. Here are some of our tips on how to grow them. Cycle: 9-11 days from seed to harvest Soak: Room temperature water, 8-12 hours 60 minute sanitize can serve as soaking Key Growing Strategies: Soak seeds in room temperature water Minimized, but optimized, light exposure Do not let lodge when covered Water stress leads to hardier shoots - they can recover from severe wilt in a matter of hours Uncovering: Sunnies should be uncovered when shoots are about 2 inches long or shorter. A better indicator than shoot length is that they should be uncovered when still perfectly vertical and before the weight of covering trays causes them to lodge Light: Minimum 2 days light in summer; 3-4 days better in winter, 4 days optimum, depending on conditions. Double up cover trays to prevent light pockets through drainage holes. Avoid excess or overly intense light as this can cause an undesirable texture. Watering: Do not water upon uncovering - give at least one day stress Water consistently afterward for good growth; wet soil also makes trays easier to clean Be sure to water trays consistently - back of trays often neglected Rotate trays 180 degrees every 2 days in winter growing conditions Excess water in hot conditions creates rapid growth but a flavorless and inferior sprout Drainage is crucial Stressors: Restricting water early in the uncovered stage leads to a redder stem and nuttier flavor Colder weather stunts growth, can also cause reddened stems Excess heat causes rapid, weak growth Disease: Susceptible to mold with poor air circulation and warm, wet conditions Mold susceptibility varies between seed lots Minor disease can be present in 5-10% of trays with little effect on yield Disease presence on new seeds is to be expected as they adapt to conditions in the greenhouse; 3-5 weeks may be required for the greenhouse ecosystem to adapt to new seeds These are just some general tips on how to grow sunflower shoot microgreens. We’re in love with Sunflower shoots over here at Nick Greens. If you have any questions feel free to contact us. #microgreens #sunflower #micro #shoots #microgreen #growingtips #growingfood #growingmicrogreens #growingindoors #growing
- The Microgreens Show | Episode 10 | Tour of True Leaf Market
Interview with two partners at True Leaf Market, and a behind the scenes of a live photo shoot with Jordan. About True Leaf Market: Website: https://www.trueleafmarket.com/ Instagram: https://www.instagram.com/trueleafmarket/ YouTube Channel: https://www.youtube.com/trueleafmarket Twitter: https://twitter.com/trueleafmarket For almost forty years, True Leaf Market Seed Company has proudly offered the best non-gmo seeds on the market. All seeds are not equal and you can count on us for super premium quality. We love hearing from our customers that report improved vigor and health from growing their own sprouts, wheatgrass, microgreens, and fruits and vegetables. #themicrogreensshow #microgreens #microgreen #seeds #vegetables #flowers #trueleafmarket #behindthescenes
- The Microgreens Show | Episode 9 | Farmers Market
Emerald Garden Microgreens talks about the benefits of participating in Denver farmers markets. About Emerald Garden Microgreens: https://www.emeraldgardens.farm/ While a grad student at MIT, health and personal challenges led me to leave school. I moved to Colorado when Dave, a childhood friend, pitched it as the ideal place to regroup. After landing a landscaping job, I envisioned cultivating communities by increasing access to delicious fresh food; inspired, I started planting microgreens. The more micros I grew, the more of them I ate; the more I ate, the better I felt! My health improved dramatically—even my outlook and mood shifted. I finally experienced the renewal I had been seeking. With Dave as co-founder, we took a huge leap of faith and established Emerald Gardens Microgreens in 2017. Our mission to invigorate lives and transform communities through fresh food resonated and we developed a loyal following. Ever grateful to live our passion, we're eager to keep expanding and sharing our harvest. #themicrogreensshow #farmersmarket #farmers #market #farmersmarketvlog #farmersmarketday #microgreen #microgreens
- The Microgreens Show | Episode 8 | Nick Greens opens up about Microgreens Business
In a new interview with a young inspiring reporter, Nick Greens shares some expert advice about being a microgreens grower. If you enjoyed this, you might also enjoy these post: "Microgreens seed Density Chart" "The Ultimate Guide to Growing Microgreens" #grow #business #learningmicrogreens #microgreens #themicrogreensshow #food #microgreensgrowing #grower #urban #farming
- The Microgreens Show | Episode 7 | Bluelab Pulse Meter
Learn how to use the bluelab pulse meter to measure your moisture and temperature on 10x20 trays. Bluelab: Get a bluelab pulse meter here Quickly and consistently measure moisture, nutrient (measured in conductivity) and temperature directly in the root zone without the need for pour-throughs, slurries or extractions. Pulse connects directly to your smartphone via the Pulse app for automated data collection, measurement comparison, storage and exporting. #getbluelab #microgreens #microgreen #microgreensgrower #pulsemeter #bluelab #hydroponics #hydroponic
- The Microgreens Show | Episode 6
The Grow Team was asked to be on Rock 107 WIRX Podcast #19 last week. This podcast is a basic introduction to microgreens. #microgreensfarm #growmicrogreens #microgreensfoodsafety #organicmicrogreens #microgreen
- The Ultimate Guide to Growing Microgreens
The ultimate guide to growing microgreens - TABLE OF CONTENTS - 1 - Overview – Rules for growing microgreens indoors 2 - Understanding the fundamentals Plant nutrition Water pH Humidity and Temperature Grow lights 3 - Choosing the right grow medium 4 - Growing Microgreens from seeds 5 - Foolproof tips for growing Microgreens? 6 - Supercharging your Microgreen growth 7 - Health benefits of Microgreens 8 - How to cook and serve with Microgreens Rules for growing microgreens indoors February 23, 2018 https://www.nickgreens.com/single-post/2018/02/23/Rules-for-growing-indoors Next winter you'll most likely want to grow microgreens outdoors(kidding). Or you might already know how to grow but need a little help (or you just don't want to admit why your microgreens died); either way we will be giving you some rules to follow, while you travel on the road to success. Equipment & System Needs The Heating System hoophouse is passive solar heated, which works fine for starting plants in earliest spring, but for growing a consistent crop of microgreens during cold and low solar months of winter, it needs to be supplemented. After research that was done, it was determined that heat mats were the most efficient direct heat option. There are several options to heat the water: electric, solar and bio gas. Water is an essential component for microgreens needs, which constantly needs to be kept at an ideal moisture level. This then makes the water accessible for the growing area. Watering equipment for our system remained pretty simple: long hoses which run along the length of a table with long neck spray nozzles that release a gentle shower. These happened to be the most flexible performers and provided good coverage. Ventilation by large fans is essential to prevent fungus in winter and keep microgreens cool in summer. They act to keep the growing constant. Ventilation is essential to the success of the growing operation. Working towards developing a system for your clients based on climate, farm setup and prospective buyers To keep track of all the crop varieties in trials, you should develop a simple log to track all the pertinent information for each trial. Document the date of the seeding, the media used, tray size if used, quantity of trays, whether you applied heat or not, quantity of seed used per unit, harvest yield and harvest date. With solid note-taking, you will be better able to track the successes, failures and troubleshooting, to minimize the latter. So, we recommend this as a practice. Documentation was important not only in trialing seeds, media, and growing conditions, but during later steady commercial production as well. Keeping good notes, not just numbers on all the variables, was key to seeing what types of systems worked best in our setup. Growing Medium You'll have to decide what you want to use for soil. Whether it'd be coir or potting soil. You'll have to decide which is best for you and figure out the ratio that best suits your growing needs. Be sure to always experiment in this stage. Mark from Vertical veg says, "using old compost will help because of the nitrogen that aids leafy vegetables." Harvesting You can experiment with microgreens to find the stage you like best – either when the first pair of leaves appear, or later, when a few leaves have grown. One exception is sunflower shoots. These need to be eaten before their second pair of leaves appear, as these are bitter. The easiest way to harvest most microgreens is with a sharp pair of kitchen scissors. Some microgreens – like pea shoots – may regrow, particularly if you chop them just above the lowest leaf. Beginners guide to plant nutrition February 6, 2018 https://www.nickgreens.com/single-post/2018/02/05/Beginners-guide-to-plant-nutrition The reason for releasing the beginners guide to plant nutrition is to help you from making wrong decisions in your indoor grow room. Visualize... by the end of this, plant nutrition will be much easier to understand than politics. Introduction Plants are able to take in essential plant nutrients through leaves, a fact known for years. Foliar fertilization has been used for years mainly with high valve crops such as vegetables and fruits. Early uses of foliar fertilization were mainly used to balance micronutrient deficiencies, such as iron deficiency with blueberries, or to boost the appearance and shelf life of foliage plants and cut flowers. Foliar applications of nutrients can balance nutrient deficiencies caused by diseases, insect damage and plants recovering from other stress conditions. Both quantity and quality of yield can be increased by foliar application of deficient nutrients, regardless of cause. Nutrient Mobility and Foliar Fertilization Foliar fertilization is especially important for nutrients that are poorly mobile in the plant. An endless supply of these nutrients is needed to provide that plant has sufficient nutrition for acceptable growth and yield. If the supply of these nutrients from the water or growing media is unable to keep up with demand, then new growth will suffer from nutrient deficiency. The application for moderately mobile or very mobile nutrients is also important when the crop cannot take and deliver adequate nutrients to the growing points of the plant, but mobile nutrients have the benefit of being able to taken for older plant tissue and translocated to the new growing points. Foliar application of mobile nutrients will help prevent the depletion of older tissue by these mobile nutrients. One frustration in using foliar sprays to supply nutrients to plants, is that intake and translocation of the applied element may not be rapid enough for growing crop yields if foliar application is the major source of a nutrient. This problem is greater for macro-nutrients. Foliar application of plant nutrients continues to gain increasing widespread acceptance. The mobility of nutrients generally is classified into three categories of mobility: very mobile, moderately mobile and poor or slightly mobile. Nitrogen (N) Nitrogen is a very mobile element within the plant, and foliar sprays using urea, nitrate salt and ammonium have been used to supplement the nitrogen levels in plants. Urea Urea is the most effective form of foliar nitrogen followed next by ammonium ion and then by nitrate ion. Urea is easiest to traverse the cutin layer to enter the plant, and is considered the most suitable form of N for foliar application because of its non polarity, rapid intake, low phytotoxicity and high solubility. Ammonium Ammonium application effectively boosts growth and yield for many crops through foliar application. Like urea, the plant assimilates most of the ammonium within 48 hours after application. Ammonium, once inside the plant cell has a similar effect on plant nitrogen, as does urea. Nitrate Nitrate, through adsorbed by the plant effectively, is less effective as a foliar source of nitrogen than urea or ammonium because it must first be convert into ammonium through nitrate reduction. Phosphorus (P) Phosphorus is a very mobile element within a plant and its application through foliar application is an effective means of supplying phosphorus. Phosphorus foliar application can increase the concentration of phosphorus in the foliage and is more effective method of delivering phosphorus to the plant via water. Potassium (K) Potassium is a very mobile element, and applications as foliar sprays utilize potassium polyphosphate, potassium sulfate, potassium nitrate, potassium thiosulfate, or potassium hydroxide. Many of these sources have low salt index, are highly soluble, and can provide potassium to plants in situations where a deficiency of this element will reduce yield or is needed for foliar plants going to market. If you would like to continue reading this guide click below to download PDF copy. #microgreens #microgreen #ultimateguide #beginnersguide #quickguide